Monday, November 17, 2014

Lightweight Java Profiler and Interactive svg Flame Graphs

A colleague of mine has just returned from the AWS re:Invent and brought in all the excitement about new AWS technologies. So I went on to watching the released videos of the talks. One of the first technical ones I have set on watching was Performance Tuning Amazon EC2 Instances by Brendan Gregg of Netflix. From Brendan's talk I have learnt about Lightweight Java Profiler (LJP) and visualizing stack traces with Flame Graphs.

I'm quite 'obsessed' with monitoring and performance tuning based on it.
Monitoring your applications is definitely the way to:

1. Get numbers on performance inside your company, spread them and let people talk stories about them.
2. Tune the system in where you see the bottleneck and measure again.

In this post I would like to share a shell script that will produce a colourful and interactive flame graph out of a stack trace of your java application. This may be useful in a variety of ways, starting from an impressive graph for you slides to making informed tuning of your code / system.

Components to build / install

This was run on ubuntu 12.04 LTS.
Checkout the Lightweight Java Profiler project source code and build it:

svn checkout \
    http://lightweight-java-profiler.googlecode.com/svn/trunk/ \
    lightweight-java-profiler-read-only 
 
cd lightweight-java-profiler-read-only/
make BITS=64 all

(omit the BITS parameter if you want to build for 32 bit platform).

As a result of successful compilation you will have a liblagent.so binary that will be used to configure your java process.


Next, clone the FlameGraph github repository:

git clone https://github.com/brendangregg/FlameGraph.git

You don't need to build anything, it is a collection of shell / perl scripts that will do the magic.

Configuring the LJP agent on your java process

Next step is to configure the LJP agent to report stats from your java process. I have picked a Solr instance running under jetty. Here is how I have configured it in my Solr startup script:

java \
-agentpath:/.../lightweight-java-profiler-read-only/\
      build-64/liblagent.so \
-Dsolr.solr.home=cores start.jar

Executing the script should start the Solr instance normally and will be logging stack trace to traces.txt

Generating a Flame graph

In order to produce a flame graph out of the LJP stack trace you will need to perform the following:

1. Convert LJP stack trace into a collapsed form that FlameGraph understands.

2. Call flamegraph.pl tool on the collapsed stack trace and produce the svg file.


I have written a shell script that will do this for you.

#!/bin/sh

# change this variable to point to your FlameGraph directory
FLAME_GRAPH_HOME=/home/dmitry/tools/FlameGraph

LJP_TRACES_FILE=${1}
FILENAME=$(basename $LJP_TRACES_FILE)

JLP_TRACES_FILE_COLLAPSED=\
   $(dirname $LJP_TRACES_FILE)\
       /${FILENAME%.*}_collapsed.${FILENAME##*.}
FLAME_GRAPH=\
       $(dirname $LJP_TRACES_FILE)/${FILENAME%.*}.svg

# collapse the LJP stack trace
$FLAME_GRAPH_HOME/stackcollapse-ljp.awk $LJP_TRACES_FILE > \
    $JLP_TRACES_FILE_COLLAPSED

# create a flame graph
$FLAME_GRAPH_HOME/flamegraph.pl $JLP_TRACES_FILE_COLLAPSED > \
    $FLAME_GRAPH


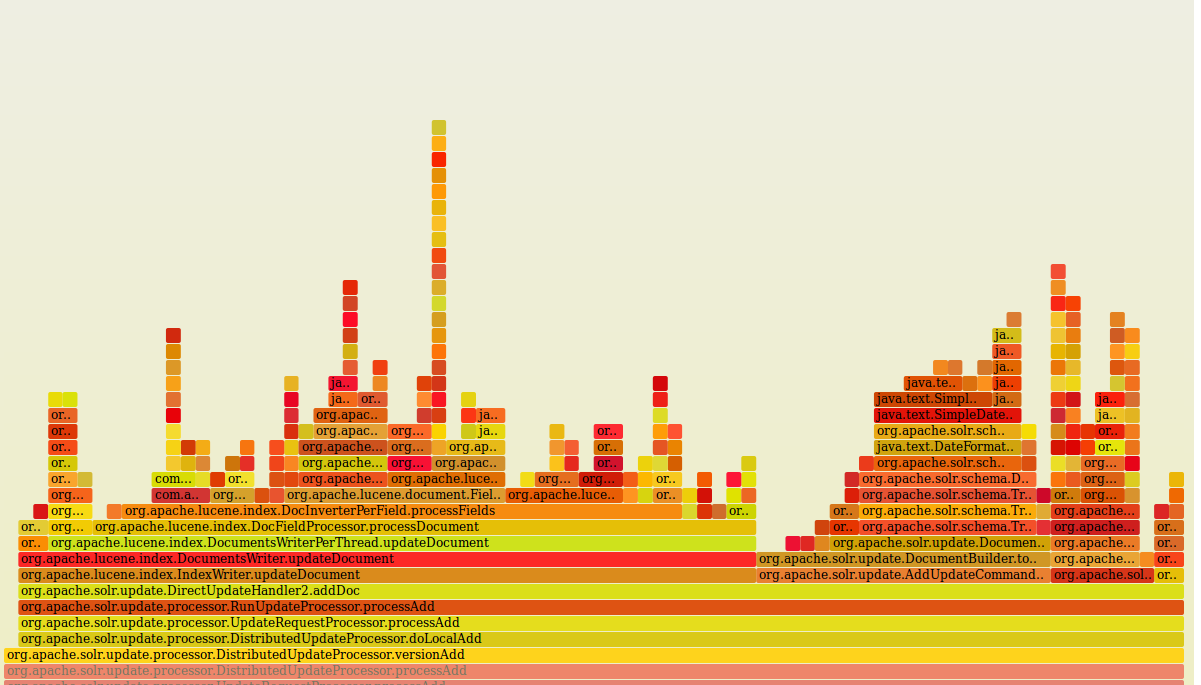
And here is the flame graph of my Solr instance under the indexing load.


You could interpret this diagram bottom-up: the lowest level is entry point class that starts the application. Then we see that CPU-wise two methods are taking the most of the time: org.eclipse.jetty.start.Main.main and java.lang.Thread.run.

This svg diagram is in fact an interactive one: load it in the browser and click on the rectangles with methods you would like to explore more. I have clicked on the
org.apache.solr.update.processor.UpdateRequestProcessor.processAdd rectangle and drilled down to it:


It is this easy to setup a CPU performance check for your java program. Remember to monitor before tuning your code and wear a helmet.

Friday, November 14, 2014

Ruby pearls and gems for your daily routine coding tasks

This is a list of ruby pearls and gems, that help me in my daily routine coding tasks.


1. Retain only unique elements in an array:

a = [1, 1, 2, 3, 4, 4, 5]

a = a.uniq # => [1, 2, 3, 4, 5]

2. Command line options parsing:

require 'optparse'
class Optparser

def self.parse(args)
  options = {}
  OptionParser.new do |opts|
    opts.banner = "Usage: example.rb [options]"

    opts.on("-v", "--[no-]verbose", "Run verbosely") do |v|
     options[:verbose] = v
    end

   opts.on("-o", "--require OUTPUTDIR", "Output directory") do |o|
     options[:output_dir] = o
   end

   options[:source_dir] = []
     opts.on("-s", "--require SOURCEDIR", "Source directory") do |s|
     options[:source_dir] << s
   end

   end.parse!

   options
  end
end

options = Optparser.parse(ARGV) #pp options  When executed with -h, this script will automatically show the options and exit.  

3. Delete a key-value pair in the hash map, where the key matches certain condition:

hashMap.delete_if {|key, value| key == "someString" }

Certainly, you can use regular expression based matching for the condition or a custom function, say, on the 'key' value.


4. Interacting with mysql. I use mysql2 gem. Check out the documentation, it is pretty self-evident.

5. Working with Apache SOLR: rsolr and rsolr-ext are invaluable here:

require 'rsolr'
require 'rsolr-ext'
solrServer = RSolr::Ext.connect :url => $solrServerUrl, :read_timeout => $read_timeout, :open_timeout => $open_timeout

doc = {field1=>"value1", "field2"=>"value2"}

solrServer.add doc

solrServer.commit(:commit_attributes => {:waitSearcher=>false, :softCommit=>false, :expungeDeletes=>true})
solrServer.optimize(:optimize_attributes => {:maxSegments=>1}) # single segment as output

Tuesday, September 23, 2014

Indexing documents in Apache Solr using custom update chain and solrj api

This post focuses on how to target custom update chain using solrj api and index your documents in Apache Solr. The reason for this post existence is because I have spent more than one hour figuring this out. This warrants a blog post (hopefully for other's benefit as well).

Setup


Suppose that you have a default update chain, that is executed in every day situations, i.e. for majority of input documents:

<updaterequestprocessorchain default="true" name="everydaychain">
<processor class="solr.LogUpdateProcessorFactory" />
<processor class="solr.RunUpdateProcessorFactory" />
</updaterequestprocessorchain>

In some specific cases you would like to execute a slightly modified update chain, in this case with a factory that drops duplicate values from document fields. For that purpose you have configured a custom update chain:

<updaterequestprocessorchain name="customchain">
<processor class="solr.UniqFieldsUpdateProcessorFactory" >
<lst name="fields">
   <str>field1</str>
<lst>
<processor class="solr.LogUpdateProcessorFactory" />
<processor class="solr.RunUpdateProcessorFactory" />
</updaterequestprocessorchain>

Your update request handler looks like this:

<requesthandler class="solr.UpdateRequestHandler" name="/update">
<lst name="defaults">
<str name="update.chain">everydaychain</str>
</requesthandler>

Every time you hit /update from your solrj backed code, you'll execute document indexing using the "everydaychain".

Task


Using solrj, index documents against the custom update chain.

Solution


First before diving into the solution, I'll show the code that you use for normal indexing process from java, i.e. with every:

HttpSolrServer httpSolrServer = null;
try {
     httpSolrServer = new HttpSolrServer("http://localhost:8983/solr/core0");
     SolrInputDocument sid = new SolrInputDocument();
     sid.addField("field1", "value1");
     httpSolrServer.add(sid);

     httpSolrServer.commit(); // hard commit; could be soft too
} catch (Exception e) {
     if (httpSolrServer != null) {
         httpSolrServer.shutdown();
     }
}

So far so good. Next turning to indexing with custom update chain. This part of non-obvious from the point of view of solrj api design: having an instance of SolrInputDocument, how would one access a custom update chain? You may notice, how the update chain is defined in the update request handler of your solrconfig.xml. It uses the update.chain parameter name. Luckily, this is an http parameter, that can be supplied on the /update endpoint. Figuring this out via http client of the httpSolrServer object led to nowhere.

Turns out, you can use UpdateRequest class instead. The object has got a nice setParam() method that lets you set a value for the update.chain parameter:

HttpSolrServer httpSolrServer = null;
        try {
            httpSolrServer = new HttpSolrServer(updateURL);

            SolrInputDocument sid = new SolrInputDocument();
            // dummy field
            sid.addField("field1", "value1");

            UpdateRequest updateRequest = new UpdateRequest();
            updateRequest.setCommitWithin(2000);
            updateRequest.setParam("update.chain", "customchain");
            updateRequest.add(sid);

            UpdateResponse updateResponse = updateRequest.process(httpSolrServer);
            if (updateResponse.getStatus() == 200) {
                log.info("Successfully added a document");
            } else {
                log.info("Adding document failed, status code=" + updateResponse.getStatus());
            }
        } catch (Exception e) {
            e.printStackTrace();
            if (httpSolrServer != null) {
                httpSolrServer.shutdown();
                log.info("Released connection to the Solr server");
            }

        }

Executing the second code will trigger the LogUpdateProcessor to output the following line in the solr logs:

org.apache.solr.update.processor.LogUpdateProcessor  –
   [core0] webapp=/solr path=/update params={wt=javabin&
      version=2&update.chain=customchain}

That's it for today. Happy indexing!

Wednesday, September 17, 2014

Exporting Lucene index to xml with Luke

Luke is the open source Lucene toolbox originally written by Andrzej Bialecki and currently maintained by yours truly. The tool allows you to introspect into your solr / lucene index, check it for health, fix problems, verify field tokens and even experiment with scoring or read the index from HDFS.

In this post I would like to illustrate one particular luke's feature, that allows you to dump index into an xml for external processing.

Task

Extract indexed tokens from a field to a file for further analysis outside luke.


Indexing data

In order to extract tokens you need to index your field with term vectors configured. Usually, this also means, that you need to configure positions and offsets.

If you are indexing using Apache Solr, you would configure the following on your field:

<field indexed="true" name="Contents" omitnorms="false" stored="true" termoffsets="true" termpositions="true" termvectors="true" type="text">

With this line you make sure you field is going to store its contents, not only index; it will also store the term vectors, i.e. a term, its positions and offsets in the token stream.


Extracting index terms

One way to view the indexed tokens with luke is to search / list documents, select the field with term vectors enabled and click TV button (or right-click and choose "Field's Term Vector").


If you would like to extract this data into an external file, there is a way currently to accomplish this via menu Tools->Export index to XML:


In this case I have selected the docid 94724 (note, that this is lucene's internal doc id, not solr application level document id!), that is visible when viewing a particular document in luke. This dumps a document into the xml file, including the fields in the schema and each field's contents. In particular, this will dump the term vectors (if present) of a field, in my case:

<field flags="Idfp--SV-Nnum--------" name="Contents">
<val>CENTURY TEXT.</val>
<tv>
<t freq="1" offsets="0-7" positions="0" text="centuri" />
<t freq="1" offsets="0-7" positions="0" text="centuryä" />
<t freq="1" offsets="8-12" positions="1" text="text" />
<t freq="1" offsets="8-12" positions="1" text="textä" />
</tv>
</field>

Monday, June 9, 2014

Low-level testing your Lucene TokenFilters

On the recent Berlin buzzwords conference talk on Apache Lucene 4 Robert Muir mentioned the Lucene's internal testing library. This library is essentially the collection of classes and methods that form the test bed for Lucene committers. But, as a matter of fact, the same library can be perfectly used in your own code. David Weiss has talked about randomized testing with Lucene, which is not the focus of this post but is really a great way of running your usual static tests with randomization.

This post will show a few code snippets, that illustrate the usage of the Lucene test library for verifying the consistency of your custom TokenFilters on lower level, than your might used to.


(Credits: http://blog.csdn.net/caoxu1987728/article/details/3294145 
I'm putting this fancy term graph to prove, that posts with images are opened more often, than those without. Ok, it has relevant parts too: in particular we are looking into creating our own TokenFilter in parallel to StopFilter, LowerCaseFilter, StandardFilter and PorterStemFilter.).


In the naming convention spirit of the previous post, where custom classes started with GroundShaking prefix, let's create our own MindBlowingTokenFilter class. For the sake of illustration, our token filter will take each term from the term stream, add "mindblowing" suffix to it and store in the stream as a new term. This class will be a basis for writing unit-tests.

package com.dmitrykan.blogspot;

import org.apache.lucene.analysis.TokenFilter;
import org.apache.lucene.analysis.TokenStream;
import org.apache.lucene.analysis.tokenattributes.CharTermAttribute;
import org.apache.lucene.analysis.tokenattributes.PositionIncrementAttribute;
import org.apache.lucene.analysis.tokenattributes.PositionLengthAttribute;

import java.io.IOException;

/**
 * Created by dmitry on 6/9/14.
 */
public final class MindBlowingTokenFilter extends TokenFilter {

    private final CharTermAttribute termAtt;
    private final PositionIncrementAttribute posAtt;
    // dummy thing, is needed for complying with BaseTokenStreamTestCase assertions
    private PositionLengthAttribute posLenAtt; // don't remove this, otherwise the low-level test will fail

    private State save;

    public static final String MIND_BLOWING_SUFFIX = "mindblowing";

    /**
     * Construct a token stream filtering the given input.
     *
     * @param input
     */
    protected MindBlowingTokenFilter(TokenStream input) {
        super(input);
        this.termAtt = addAttribute(CharTermAttribute.class);
        this.posAtt = addAttribute(PositionIncrementAttribute.class);
        this.posLenAtt = addAttribute(PositionLengthAttribute.class);
    }

    @Override
    public boolean incrementToken() throws IOException {
        if( save != null ) {
            restoreState(save);
            save = null;
            return true;
        }

        if (input.incrementToken()) {
            // pass through zero-length terms
            int oldLen = termAtt.length();
            if (oldLen == 0) return true;
            int origOffset = posAtt.getPositionIncrement();

            // save original state
            posAtt.setPositionIncrement(0);
            save = captureState();

            //char[] origBuffer = termAtt.buffer();

            char [] buffer = termAtt.resizeBuffer(oldLen + MIND_BLOWING_SUFFIX.length());

            for (int i = 0; i < MIND_BLOWING_SUFFIX.length(); i++) {
                buffer[oldLen + i] = MIND_BLOWING_SUFFIX.charAt(i);
            }

            posAtt.setPositionIncrement(origOffset);
            termAtt.copyBuffer(buffer, 0, oldLen + MIND_BLOWING_SUFFIX.length());

            return true;
        }
        return false;
    }
}

The next thing we would like to do is to write a Lucene-level test suite for this class. We will extend it from BaseTokenStreamTestCase, not standard TestCase or other class from a testing framework you might have used to deal with. The reason being we'd like to utilize the internal Lucene's test functionality, that lets you access and cross check the lower-level items, like term position increments, position lengths, position start and end offsets etc.

About the same information you can see with Apache Solr's analysis page, if you enable verbose mode. While the analysis page is good to visually debug your code, the unit test is meant to run for you every time you change and build you code. If you decide to first visually examine the term positions, start and end offsets with Solr, you'll need to wrap the token filter into factory and register it in the schema on your field type. The factory code:

package com.dmitrykan.blogspot;

import org.apache.lucene.analysis.TokenStream;
import org.apache.lucene.analysis.util.TokenFilterFactory;

import java.util.Map;

/**
 * Created by dmitry on 6/9/14.
 */
public class MindBlowingTokenFilterFactory extends TokenFilterFactory {
    public MindBlowingTokenFilterFactory(Map args) {
        super(args);
    }

    public MindBlowingTokenFilter create(TokenStream input) {
        return new MindBlowingTokenFilter(input);
    }

}

Here is the test class in all its glory.

package com.dmitrykan.blogspot;

import org.apache.lucene.analysis.Analyzer;
import org.apache.lucene.analysis.BaseTokenStreamTestCase;
import org.apache.lucene.analysis.MockTokenizer;
import org.apache.lucene.analysis.Tokenizer;

import java.io.IOException;
import java.io.Reader;

/**
 * Created by dmitry on 6/9/14.
 */
public class TestMindBlowingTokenFilter extends BaseTokenStreamTestCase {
    private Analyzer analyzer = new Analyzer() {
        @Override
        protected TokenStreamComponents createComponents(String fieldName, Reader reader) {
            Tokenizer source = new MockTokenizer(reader, MockTokenizer.WHITESPACE, true);
            return new TokenStreamComponents(source, new MindBlowingTokenFilter(source));
        }
    };

    public void testPositionIncrementsSingleTerm() throws IOException {

        String output[] = {"queries" + MindBlowingTokenFilter.MIND_BLOWING_SUFFIX, "queries"};
        // the position increment for the first term must be one in this case and of the second must be 0,
        // because the second term is stored in the same position in the token filter stream
        int posIncrements[] = {1, 0};
        // this is dummy stuff, but the test does not run without it
        int posLengths[] = {1, 1};

        assertAnalyzesToPositions(analyzer, "queries", output, posIncrements, posLengths);
    }

    public void testPositionIncrementsTwoTerm() throws IOException {

        String output[] = {"your" + MindBlowingTokenFilter.MIND_BLOWING_SUFFIX, "your", "queries" + MindBlowingTokenFilter.MIND_BLOWING_SUFFIX, "queries"};
        // the position increment for the first term must be one in this case and of the second must be 0,
        // because the second term is stored in the same position in the token filter stream
        int posIncrements[] = {1, 0, 1, 0};
        // this is dummy stuff, but the test does not run without it
        int posLengths[] = {1, 1, 1, 1};

        assertAnalyzesToPositions(analyzer, "your queries", output, posIncrements, posLengths);
    }

    public void testPositionIncrementsFourTerms() throws IOException {

        String output[] = {
                "your" + MindBlowingTokenFilter.MIND_BLOWING_SUFFIX, "your",
                "queries" + MindBlowingTokenFilter.MIND_BLOWING_SUFFIX, "queries",
                "are" + MindBlowingTokenFilter.MIND_BLOWING_SUFFIX, "are",
                "fast" + MindBlowingTokenFilter.MIND_BLOWING_SUFFIX, "fast"};
        // the position increment for the first term must be one in this case and of the second must be 0,
        // because the second term is stored in the same position in the token filter stream
        int posIncrements[] = {
                1, 0,
                1, 0,
                1, 0,
                1, 0};
        // this is dummy stuff, but the test does not run without it
        int posLengths[] = {
                1, 1,
                1, 1,
                1, 1,
                1, 1};

        // position increments are following the 1-0 pattern, because for each next term we insert a new term into
        // the same position (i.e. position increment is 0)
        assertAnalyzesToPositions(analyzer, "your queries are fast", output, posIncrements, posLengths);
    }

    public void testPositionOffsetsFourTerms() throws IOException {

        String output[] = {
                "your" + MindBlowingTokenFilter.MIND_BLOWING_SUFFIX, "your",
                "queries" + MindBlowingTokenFilter.MIND_BLOWING_SUFFIX, "queries",
                "are" + MindBlowingTokenFilter.MIND_BLOWING_SUFFIX, "are",
                "fast" + MindBlowingTokenFilter.MIND_BLOWING_SUFFIX, "fast"};
        // the position increment for the first term must be one in this case and of the second must be 0,
        // because the second term is stored in the same position in the token filter stream
        int startOffsets[] = {
                0, 0,
                5, 5,
                13, 13,
                17, 17};
        // this is dummy stuff, but the test does not run without it
        int endOffsets[] = {
                4, 4,
                12, 12,
                16, 16,
                21, 21};

        assertAnalyzesTo(analyzer, "your queries are fast", output, startOffsets, endOffsets);
    }

}

All tests should pass and yes, the same numbers are present on the Solr's analysis page:


MindBlowingTokenFilter solr analysis page


Happy unit testing with Lucene!

your @dmitrykan

Wednesday, May 28, 2014

Using system disk cache for speeding up the indexing with SOLR

Benchmarking is rather hard subject of software development, especially in a sand-boxed development environments, like JVM with "uncontrolled" garbage collection. Still, there are tasks, that are more IO heavy, like indexing xml files into Apache Solr and this is where you can control more on the system level to do better benchmarking.

So what about batch indexing? There are ways to speed it up purely on SOLR side.

This post shows a possible remedy to speeding up indexing purely on the system level, and assumes linux as the system.

The benchmarking setup that I had is the following:

Apache SOLR 4.3.1
Ubuntu with 16G RAM
Committing via softCommit feature

What I set up to do is to play around the system disk cache. One of the recommendations of speeding up the search is to cat the index files into the cache, using the command:

cat an_index_file > /dev/null

Then the index is read from the disk cache buffers and is faster than reading it cold.

What about bulk indexing xml files into Solr? We could cat the xml files to be indexed into the disk cache and possibly speed up the indexing. The following figures are not exactly statistically significant, nor was the test done on a large amount of xml files, but the figures do show the trend:

With warmed up disk cache:
real    1m27.604s
user    0m2.220s
sys    0m2.860s

After dropping the file cache:
echo 3 | sudo tee /proc/sys/vm/drop_caches

real    1m30.285s
user    0m2.148s
sys    0m3.700s

Again, hot cache:
real    1m27.924s
user    0m2.264s
sys    0m3.068s


Again, after dropping the file cache:
echo 3 | sudo tee /proc/sys/vm/drop_caches

real    1m32.791s
user    0m2.204s
sys    0m3.104s

The figures above are pretty clear, that having the files cached speeds the indexing up by about 3-5 seconds for just 420 xml files.

Coupled with ways of increasing the throughput on the SOLR side this approach could win some more seconds / minutes / hours in the batch indexing.

Monday, May 5, 2014

Making jetty / apache tomcat work on amazon ec2 windows instance

Suppose you have an Amazon ec2 instance running windows OS. One day you decided to run jetty or apache tomcat servlet containers. What does it take to enable these servers to be visible outside your security group, say Internet?

1. Enable the target port in the amazon console like this (supposing it is port 8080):

,

One may think this should be enough. But, that is not so. Not in the case of windows box at least.

Next is:

2. You need to edit the security rules of the windows box such that the inbound connection on port 8080 is allowed:


3. You are done!

Saturday, May 3, 2014

Weka проект-заготовка для задачи распознавания тональности (сентимента)

Это перевод моей предыдущей публикации на английском языке.
 
Интернет полон статьями, заметками, блогами и успешными историями применения машинного обучения (machine learning, ML) для решения практических задач. Кто-то использует его для пользы и просто поднять настроение, как эта картинка:


credits: Customers Who Bought This Item Also Bought PaulsHealthBlog.com, 11.04.2014
 

Правда, человеку, не являющемуся экспертом в этих областях, подчас не так просто подобраться к существующему инструментарию. Есть, безусловно, хорошие и относительно быстрые пути к практическому машинному обучению, например, Python-библиотека scikit. Кстати, этот проект содержит код, написанный в команде SkyNet и иллюстрирующий простоту взаимодействия с библиотекой. Если вы Java разработчик, есть пара хороших инструментов: Weka и Apache Mahout. Обе библиотеки универсальны с точки зрения применимости к конкретной задаче: от рекомендательных систем до классификации текстов. Существует инструментарий и более заточенный под текстовое машинное обучение: Mallet и набор библиотек Stanford. Есть и менее известные библиотеки, как Java-ML.

В этом посте мы сфокусируемся на библиотеке Weka и сделаем проект-заготовку или проект-шаблон для текстового машинного обучения на конкретном примере: задача распознавания тональности или сентимента (sentiment analysis, sentiment detection). Несмотря на всё это, проект полностью рабочий и даже под commercial-friendly лицензией, т.е. при большом желании вы можете даже применить код в своих проектах. Из всего набора в целом подходящих для выбранной задачи алгоритмов Weka мы воспользуемся алгоритмом Multinomial Naive Bayes. В этом посте я почти всегда привожу те же ссылки, что и в английской версии. Но так как перевод задача творческая, позволю себе привести ссылку по теме на отечественный ресурс по машинному обучению.

По моему мнению и опыту взаимодействия с инструментарием машинного обучения, обычно программист находится в поисках решения трёх задач при использовании той или иной ML-библиотеки: настройка алгоритма, тренировка алгоритма и I/O, т.е. сохранение на диск и загрузка с диска натренированной модели в память. Помимо перечисленных сугубо практических аспектов из теоретических, пожалуй, наиболее важным является оценка качества модели. Мы коснёмся этого тоже.

Итак, по порядку.

Настройка алгоритма классификации 

Начнём с задачи распознавания тональности на три класса. 

public class ThreeWayMNBTrainer {
    private NaiveBayesMultinomialText classifier;
    private String modelFile;
    private Instances dataRaw;

    public ThreeWayMNBTrainer(String outputModel) {
        // create the classifier
        classifier = new NaiveBayesMultinomialText();
        // filename for outputting the trained model
        modelFile = outputModel;

        // listing class labels
        ArrayList<attribute> atts = new ArrayList<attribute>(2);
        ArrayList<string> classVal = new ArrayList<string>();
        classVal.add(SentimentClass.ThreeWayClazz.NEGATIVE.name());
        classVal.add(SentimentClass.ThreeWayClazz.POSITIVE.name());
        atts.add(new Attribute("content",(ArrayList<string>)null));
        atts.add(new Attribute("@@class@@",classVal));
        // create the instances data structure
        dataRaw = new Instances("TrainingInstances",atts,10);
    }

}

В приведённом коде происходит следующее:
  • Создаётся объект класса алгоритма классификации (мы любим каламбуры)
  • Приводится список меток целевых классов: NEGATIVE и POSITIVE
  • Создаётся структура данных для хранения пар (объект, метка класса)
Похожим образом, но с бо́льшим количеством выходных меток, создаётся классификатор на 5 классов:

public class FiveWayMNBTrainer {
    private NaiveBayesMultinomialText classifier;
    private String modelFile;
    private Instances dataRaw;

    public FiveWayMNBTrainer(String outputModel) {
        classifier = new NaiveBayesMultinomialText();
        classifier.setLowercaseTokens(true);
        classifier.setUseWordFrequencies(true);

        modelFile = outputModel;

        ArrayList<Attribute> atts = new ArrayList<Attribute>(2);
        ArrayList<String> classVal = new ArrayList<String>();
        classVal.add(SentimentClass.FiveWayClazz.NEGATIVE.name());
        classVal.add(SentimentClass.FiveWayClazz.SOMEWHAT_NEGATIVE.name());
        classVal.add(SentimentClass.FiveWayClazz.NEUTRAL.name());
        classVal.add(SentimentClass.FiveWayClazz.SOMEWHAT_POSITIVE.name());
        classVal.add(SentimentClass.FiveWayClazz.POSITIVE.name());
        atts.add(new Attribute("content",(ArrayList<String>)null));
        atts.add(new Attribute("@@class@@",classVal));

        dataRaw = new Instances("TrainingInstances",atts,10);
    }
}

Тренировка классификатора

Тренировка алгоритма классификации или классификатора заключается в сообщению алгоритму примеров (объект, метка), помещённых в пару (x,y). Объект описывается некоторыми признаками, по набору (или вектору) которых можно качественно отличать объект одного класса от объекта другого класса. Скажем, в задаче классификации объектов-фруктов, к примеру на два класса: апельсины и яблоки, такими признаками могли бы быть: размер, цвет, наличие пупырышек, наличие хвостика. В контексте задачи распознавания тональности вектор признаков может состоять из слов (unigrams) либо пар слов (bigrams). А метками будут названия (либо порядковые номера) классов тональности: NEGATIVE, NEUTRAL или POSITIVE. На основе примеров мы ожидаем, что алгоритм сможет обучиться и обобщиться до уровня предсказания неизвестной метки y' по вектору признаков x'.

Реализуем метод добавления пары (x,y) для классификации тональности на три класса. Будем полагать, что вектором признаков является список слов.

public void addTrainingInstance(SentimentClass.ThreeWayClazz threeWayClazz, String[] words) {
        double[] instanceValue = new double[dataRaw.numAttributes()];
        instanceValue[0] = dataRaw.attribute(0).addStringValue(Join.join(" ", words));
        instanceValue[1] = threeWayClazz.ordinal();
        dataRaw.add(new DenseInstance(1.0, instanceValue));
        dataRaw.setClassIndex(1);
    }

На самом деле в качестве второго параметра мы могли передать в метод и строку вместо массива строк. Но мы намеренно работаем с массивом элементов, чтобы выше в коде была возможность наложить те фильтры, которые мы хотим. Для анализа тональности (а быть может, и для других задач текстового машинного обучения) вполне релевантным фильтром является склеивание слов отрицаний (частиц и тд) с последующим словом: не нравится => не_нравится. Таким образом, признаки нравится и не_нравится образуют разнополярные сущности. Без склейки мы получили бы, что слово нравится может встретиться как в позитивном, так и в негативном контекстах, а значит не несёт нужного сигнала (в отличие от реальности). На следующем шаге, при построении классификатора строка из элементов-строк будет токенизирована и превращена в вектор.

Собственно, тренировка классификатора реализуется в одну строку:

public void trainModel() throws Exception {
        classifier.buildClassifier(dataRaw);
    }

Просто!

I/O (сохранение и загрузка модели)

Вполне распространённым сценарием в области машинного обучения является тренировка модели классификатора в памяти и последующее распознавание / классификация новых объектов. Однако для работы в составе некоторого продукта модель должна поставляться на диске и загружаться в память. Сохранение на диск и загрузка с диска в память натренированной модели в Weka достигается очень просто благодаря тому, что классы алгоритмов классификации реализуют среди множества прочих интерфейс Serializable.

Сохранение натренированной модели:

public void saveModel() throws Exception {
        weka.core.SerializationHelper.write(modelFile, classifier);
    }

Загрузка натренированной модели:
public void loadModel(String _modelFile) throws Exception {
        NaiveBayesMultinomialText classifier = (NaiveBayesMultinomialText) weka.core.SerializationHelper.read(_modelFile);
        this.classifier = classifier;
    }


После загрузки модели с диска займёмся классификацией текстов. Для трёх-классового предсказания реализуем такой метод:

public SentimentClass.ThreeWayClazz classify(String sentence) throws Exception {
        double[] instanceValue = new double[dataRaw.numAttributes()];
        instanceValue[0] = dataRaw.attribute(0).addStringValue(sentence);

        Instance toClassify = new DenseInstance(1.0, instanceValue);
        dataRaw.setClassIndex(1);
        toClassify.setDataset(dataRaw);

        double prediction = this.classifier.classifyInstance(toClassify);

        double distribution[] = this.classifier.distributionForInstance(toClassify);
        if (distribution[0] != distribution[1])
            return SentimentClass.ThreeWayClazz.values()[(int)prediction];
        else
            return SentimentClass.ThreeWayClazz.NEUTRAL;
    }

Обратите внимание на строку номер 12. Как вы помните, мы определили список меток классов для данного случая как: {NEGATIVE, POSITIVE}. Поэтому в принципе наш классификатор должен быть как минимум бинарным. Но! В случае если распределение вероятностей двух данных меток одинаково (по 50%), можно совершенно уверенно полагать, что мы имеем дело с нейтральным классом. Таким образом, мы получаем классификатор на три класса.

Если классификатор построен верно, то следующий юнит-тест должен отработать верно:

@org.junit.Test
    public void testArbitraryTextPositive() throws Exception {
        threeWayMnbTrainer.loadModel(modelFile);
        Assert.assertEquals(SentimentClass.ThreeWayClazz.POSITIVE, threeWayMnbTrainer.classify("I like this weather"));
    }

Для полноты реализуем класс-оболочку, который строит и тренирует классификатор, сохраняет модель на диск и тестирует модель на качество:

public class ThreeWayMNBTrainerRunner {
    public static void main(String[] args) throws Exception {
        KaggleCSVReader kaggleCSVReader = new KaggleCSVReader();
        kaggleCSVReader.readKaggleCSV("kaggle/train.tsv");
        KaggleCSVReader.CSVInstanceThreeWay csvInstanceThreeWay;

        String outputModel = "models/three-way-sentiment-mnb.model";

        ThreeWayMNBTrainer threeWayMNBTrainer = new ThreeWayMNBTrainer(outputModel);

        System.out.println("Adding training instances");
        int addedNum = 0;
        while ((csvInstanceThreeWay = kaggleCSVReader.next()) != null) {
            if (csvInstanceThreeWay.isValidInstance) {
                threeWayMNBTrainer.addTrainingInstance(csvInstanceThreeWay.sentiment, csvInstanceThreeWay.phrase.split("\\s+"));
                addedNum++;
            }
        }

        kaggleCSVReader.close();

        System.out.println("Added " + addedNum + " instances");

        System.out.println("Training and saving Model");
        threeWayMNBTrainer.trainModel();
        threeWayMNBTrainer.saveModel();

        System.out.println("Testing model");
        threeWayMNBTrainer.testModel();
    }
}


Качество модели

Как вы уже догадались, тестирование качества модели тоже довольно просто реализуется с Weka. Вычисление качественных характеристик модели необходимо, например, для того, чтобы проверить, переобучилась ли или недоучилась наша модель. С недоученностью модели интуитивно понятно: мы не нашли оптимального количества признаков классифицируемых объектов, и модель получилась слишком простой. Переобучение означает, что модель слишком подстроилась под примеры, т.е. она не обобщается на реальный мир, являясь излишне сложной.

Существуют разные способы тестирования модели. Один из таких способов заключается в выделении тестовой выборки из тренировочного набора (скажем, одну треть) и прогоне через кросс-валидацию. Т.е. на каждой новой итерации мы берём новую треть тренировочного набора в качестве тестовой выборки и вычисляем уместные для решаемой задачи параметры качества, например, точность / полноту / аккуратность и т.д. В конце такого прогона вычисляем среднее по всем итерациям. Это будет амортизированным качеством модели. Т.е., на практике оно может быть ниже, чем по полному тренировочному набору данных, но ближе к качеству в реальной жизни.

Однако для беглого взгляда на точность модели достаточно посчитать аккуратность, т.е. количество верных ответов к неверным:

public void testModel() throws Exception {
        Evaluation eTest = new Evaluation(dataRaw);
        eTest.evaluateModel(classifier, dataRaw);
        String strSummary = eTest.toSummaryString();
        System.out.println(strSummary);
    }

Данный метод выводит следующие стастистики:

Correctly Classified Instances       28625               83.3455 %
Incorrectly Classified Instances      5720               16.6545 %
Kappa statistic                          0.4643
Mean absolute error                      0.2354
Root mean squared error                  0.3555
Relative absolute error                 71.991  %
Root relative squared error             87.9228 %
Coverage of cases (0.95 level)          97.7697 %
Mean rel. region size (0.95 level)      83.3426 %
Total Number of Instances            34345     

Таким образом, аккуратность модели по всему тренировочному набору 83,35%. Полный проект с кодом можно найти на моём github. Код использует данные с kaggle. Поэтому если вы решите использовать код (либо даже посоревноваться на конкурсе) вам понадобится принять условия участия и скачать данные. Задача реализации полного кода для классификации тональности на 5 классов остаётся читателю. Успехов!

Sunday, April 27, 2014

Weka template project for sentiment classification of an English text

Internet is buzzing about machine learning. Many folks use it for fun and profit

credits: Customers Who Bought This Item Also Bought PaulsHealthBlog.com, 11.04.2014

But! When a non-expert gets around started with these topics in practice, it becomes increasingly difficult to just get going. There are of course quick solutions, like scikit-learn library for Python. If you are a Java developer, there are a few options as well: Weka, Apache Mahout. Both of these are generic enough to be applied to different machine learning problems, including text classification. More tailored libraries and packages for text oriented machine learning in Java are Mallet and Stanford's set of libraries. There are as well some less known machine learning toolkits, like Java-ML.

This post will focus on Weka and will give you a very simple and working template project for classifying sentiment in the English text. Specifically, we will create three way sentiment classifier using Multinomial Naive Bayes algorithm.

In my view, there are three main practical problems, that a programmer seeks to find solutions for using a machine learning library: setting up a classifier algorithm, adding training instances (effectively, training the classifier) and I/O (storing and retrieving a model). Beyond this and of high importance is measuring the quality of the trained model that we will take a look at as well.

Setting up a classifier

As mentioned above, we will use the Multinomial Naive Bayes algorithm. To get going, let's set it up for the three way sentiment classification:


public class ThreeWayMNBTrainer {
    private NaiveBayesMultinomialText classifier;
    private String modelFile;
    private Instances dataRaw;

    public ThreeWayMNBTrainer(String outputModel) {
        // create the classifier
        classifier = new NaiveBayesMultinomialText();
        // filename for outputting the trained model
        modelFile = outputModel;

        // listing class labels
        ArrayList<attribute> atts = new ArrayList<attribute>(2);
        ArrayList<string> classVal = new ArrayList<string>();
        classVal.add(SentimentClass.ThreeWayClazz.NEGATIVE.name());
        classVal.add(SentimentClass.ThreeWayClazz.POSITIVE.name());
        atts.add(new Attribute("content",(ArrayList<string>)null));
        atts.add(new Attribute("@@class@@",classVal));
        // create the instances data structure
        dataRaw = new Instances("TrainingInstances",atts,10);
    }

}

What goes in the above code is:
  • Create the classifier
  • List the target labels: NEGATIVE and POSITIVE
  • Create the instances data structure
In a similar fashion, but with more classes (target labels) we'd set up a five way classifier, using the same algorithm under the hood:

public class FiveWayMNBTrainer {
    private NaiveBayesMultinomialText classifier;
    private String modelFile;
    private Instances dataRaw;

    public FiveWayMNBTrainer(String outputModel) {
        classifier = new NaiveBayesMultinomialText();
        classifier.setLowercaseTokens(true);
        classifier.setUseWordFrequencies(true);

        modelFile = outputModel;

        ArrayList<Attribute> atts = new ArrayList<Attribute>(2);
        ArrayList<String> classVal = new ArrayList<String>();
        classVal.add(SentimentClass.FiveWayClazz.NEGATIVE.name());
        classVal.add(SentimentClass.FiveWayClazz.SOMEWHAT_NEGATIVE.name());
        classVal.add(SentimentClass.FiveWayClazz.NEUTRAL.name());
        classVal.add(SentimentClass.FiveWayClazz.SOMEWHAT_POSITIVE.name());
        classVal.add(SentimentClass.FiveWayClazz.POSITIVE.name());
        atts.add(new Attribute("content",(ArrayList<String>)null));
        atts.add(new Attribute("@@class@@",classVal));

        dataRaw = new Instances("TrainingInstances",atts,10);
    }
}

Adding training instances (training a classifier)

Training the classifier is the process of showing examples to the algorithm. An example usually consists of a set of pairs (x,y), where x is a feature vector and y is a label for this vector. In the context of sentiment analysis specifically, a feature vector can be words (unigrams) in a sentence and a label is sentiment: NEGATIVE, NEUTRAL or POSITIVE in the case of three way sentiment classification. The algorithm is expected to learn from the example set and generalize to predict labels y' for the previously unseen vectors x'.

Engineering the features is both the mix of art and mechanical work, as I've once mentioned. And also finding good classifier options can be a task for statistical analysis with visualization.

Let's implement the method for adding the training instances for three way classification:

public void addTrainingInstance(SentimentClass.ThreeWayClazz threeWayClazz, String[] words) {
        double[] instanceValue = new double[dataRaw.numAttributes()];
        instanceValue[0] = dataRaw.attribute(0).addStringValue(Join.join(" ", words));
        instanceValue[1] = threeWayClazz.ordinal();
        dataRaw.add(new DenseInstance(1.0, instanceValue));
        dataRaw.setClassIndex(1);
    }

So basically we put input unigrams (words) as a String x value and integer of label as y value, thus forming a training instance for the algorithm. Next the algorithm will internally tokenize the input string sequence and update the necessary probabilities.

For five way classification the above method looks almost the same, except the first parameter is of type SentimentClass.FiveWayClazz.

Training the model after we have finished adding the training examples is quite simple:

public void trainModel() throws Exception {
        classifier.buildClassifier(dataRaw);
    }

That's it!

I/O (storing and retrieving the trained model)

It is ok to train a model and classify right a way. But, that does not work, if you want to develop your model and ship that to production. In production mode your trained classifier will do its main work: classify new instances. So your model must be pre-trained and exist on disk. Storing and loading a trained model with Weka is extremely easy. This is thanks to the fact the classifiers extend abstract class AbstractClassifier, which in turn implements Serializable interface among others.

Storing the trained model is as easy as:

public void saveModel() throws Exception {
        weka.core.SerializationHelper.write(modelFile, classifier);
    }

And loading the model is easy too:
public void loadModel(String _modelFile) throws Exception {
        NaiveBayesMultinomialText classifier = (NaiveBayesMultinomialText) weka.core.SerializationHelper.read(_modelFile);
        this.classifier = classifier;
    }


After we have loaded the model, let's classify some texts. The method for the three way classification is:

public SentimentClass.ThreeWayClazz classify(String sentence) throws Exception {
        double[] instanceValue = new double[dataRaw.numAttributes()];
        instanceValue[0] = dataRaw.attribute(0).addStringValue(sentence);

        Instance toClassify = new DenseInstance(1.0, instanceValue);
        dataRaw.setClassIndex(1);
        toClassify.setDataset(dataRaw);

        double prediction = this.classifier.classifyInstance(toClassify);

        double distribution[] = this.classifier.distributionForInstance(toClassify);
        if (distribution[0] != distribution[1])
            return SentimentClass.ThreeWayClazz.values()[(int)prediction];
        else
            return SentimentClass.ThreeWayClazz.NEUTRAL;
    }

Notice the line #12. Remember, that we have defined the target classes for the three way classifier as {NEGATIVE, POSITIVE}. So in principle our classifier should be capable to do the binary classification. But! In the event when the probability distribution between the classes is exactly equal, we can safely assume it is NEUTRAL class. So we get the three way classifier. The following test case should ideally pass:

@org.junit.Test
    public void testArbitraryTextPositive() throws Exception {
        threeWayMnbTrainer.loadModel(modelFile);
        Assert.assertEquals(SentimentClass.ThreeWayClazz.POSITIVE, threeWayMnbTrainer.classify("I like this weather"));
    }

Neat!

To wrap things up, here is the "runner" class that builds the three-way classifier, saves the model and tests it for quality over the training data:

public class ThreeWayMNBTrainerRunner {
    public static void main(String[] args) throws Exception {
        KaggleCSVReader kaggleCSVReader = new KaggleCSVReader();
        kaggleCSVReader.readKaggleCSV("kaggle/train.tsv");
        KaggleCSVReader.CSVInstanceThreeWay csvInstanceThreeWay;

        String outputModel = "models/three-way-sentiment-mnb.model";

        ThreeWayMNBTrainer threeWayMNBTrainer = new ThreeWayMNBTrainer(outputModel);

        System.out.println("Adding training instances");
        int addedNum = 0;
        while ((csvInstanceThreeWay = kaggleCSVReader.next()) != null) {
            if (csvInstanceThreeWay.isValidInstance) {
                threeWayMNBTrainer.addTrainingInstance(csvInstanceThreeWay.sentiment, csvInstanceThreeWay.phrase.split("\\s+"));
                addedNum++;
            }
        }

        kaggleCSVReader.close();

        System.out.println("Added " + addedNum + " instances");

        System.out.println("Training and saving Model");
        threeWayMNBTrainer.trainModel();
        threeWayMNBTrainer.saveModel();

        System.out.println("Testing model");
        threeWayMNBTrainer.testModel();
    }
}


The quality of the model

Testing the trained model is fairly easy with Weka as well. Knowing the quality of your model is important because you want to make sure that there is no under- or overfitting happening. Underfitting means you haven't found an optimum of features describing your fenomena to fully utilize your training data, thus the model is long-sighted or too simple. Overfitting means you deal with over-learning your training data and over-adjusting for it, i.e. the model does not generalize for real world instances and becomes too short-sighted or too complex.

There are different ways to test the model, one is use part of you training data as test data (for example one third) and perform N fold cross-validation. I.e. on each iteration take a new piece of training data for test data and compute sensible metrics, like precision / recall / accuracy etc. In the end of the cross-validation take average over computed values. This will be your "amortized" quality.

We can also take a peek look at the quality by just counting the number of correctly classified instances from the training data:

    public void testModel() throws Exception {
        Evaluation eTest = new Evaluation(dataRaw);
        eTest.evaluateModel(classifier, dataRaw);
        String strSummary = eTest.toSummaryString();
        System.out.println(strSummary);
    }

The method outputs the following statistics:

Correctly Classified Instances       28625               83.3455 %
Incorrectly Classified Instances      5720               16.6545 %
Kappa statistic                          0.4643
Mean absolute error                      0.2354
Root mean squared error                  0.3555
Relative absolute error                 71.991  %
Root relative squared error             87.9228 %
Coverage of cases (0.95 level)          97.7697 %
Mean rel. region size (0.95 level)      83.3426 %
Total Number of Instances            34345     

The code can be found on my github. It utilizes the data posted on kaggle. So if you want to use the code as is (and perhaps even make a submission) you need to accept the terms of the kaggle competition and download the training set. I leave the exercise of implementing the full code for five-way classification and code for classifying kaggle's test set to the reader.


Monday, March 31, 2014

Implementing own LuceneQParserPlugin for Solr

Whenever you need to implement a query parser in Solr, you start by sub-classing the LuceneQParserPlugin:


public class MyGroundShakingQueryParser 
                           extends LuceneQParserPlugin {
    public QParser createParser(String qstr, 
                                SolrParams localParams,
                                SolrParams params,
                                SolrQueryRequest req) {}
}

In this way you will reuse the underlining functionality and parser of the LuceneQParserPlugin. The grammar of the parser is defined in QueryParser.jj file inside Lucene/Solr source code tree.

The grammar that QueryParser.jj uses is BNF. The JavaCC tool implements parsing of such grammars and producing the java code for you. The produced code is effectively a parser with built-in validation etc.

In Solr there is its own version of LuceneQParserPlugin: it is called QParserPlugin and in fact it pretty much implements almost the same functionality as its counterpart.

There could be use cases for customization of the lucene parsing grammar (stored in QueryParser.jj). Once the customization is done (let's rename the jj file to GroundShakingQueryParser.jj), we invoke the javacc tool and it produces a GroundShakingQueryParser.java and supplementary classes. In order to wire it into the Solr we need to do a few things. The final class inter-play is shown on the class diagram:

class diagram of inter-relations between classes
Going bottom up:
1. You implement your custom logic in GroundShakingQueryParser.jj that produces GroundShakingQueryParser.java. Make sure the class extends SolrQueryParserBase.
2. To wire this into Solr, we need to extend the GroundShakingQueryParser class in GroundShakingSolrQueryParser class.

/**
 * Solr's default query parser, a schema-driven superset of the classic lucene query parser.
 * It extends the query parser class with modified grammar stored in GroundShakingQueryParser.jj.
 */
public class GroundShakingSolrQueryParser extends GroundShakingQueryParser {

  public GroundShakingSolrQueryParser(QParser parser, String defaultField) {
    super(parser.getReq().getCore().getSolrConfig().luceneMatchVersion, defaultField, parser);
  }

}

3. Instance of GroundShakingSolrQueryParser is acquired in the GroundShakingLuceneQParser class.

class GroundShakingLuceneQParser extends QParser {
    GroundShakingSolrQueryParser lparser;

    public GroundShakingLuceneQParser(String qstr, SolrParams localParams, SolrParams params, SolrQueryRequest req) {
        super(qstr, localParams, params, req);
    }


    @Override
    public Query parse() throws SyntaxError {
        String qstr = getString();
        if (qstr == null || qstr.length()==0) return null;

        String defaultField = getParam(CommonParams.DF);
        if (defaultField==null) {
            defaultField = getReq().getSchema().getDefaultSearchFieldName();
        }
        lparser = new GroundShakingSolrQueryParser(this, defaultField);

        lparser.setDefaultOperator
                (GroundShakingQueryParsing.getQueryParserDefaultOperator(getReq().getSchema(),
                        getParam(QueryParsing.OP)));

            return lparser.parse(qstr);
    }


    @Override
    public String[] getDefaultHighlightFields() {
        return lparser == null ? new String[]{} : new String[]{lparser.getDefaultField()};
    }

}


4. GroundShakingLuceneQParser is wired into GroundShakingQParserPlugin that extends the aforementioned QParserPlugin.


public class GroundShakingQParserPlugin extends QParserPlugin {
  public static String NAME = "lucene";

  @Override
  public void init(NamedList args) {
  }

  @Override
  public QParser createParser(String qstr, SolrParams localParams, SolrParams params, SolrQueryRequest req) {
    return new GroundShakingLuceneQParser(qstr, localParams, params, req);
  }
}


5.  Now we have our custom GroundShakingLuceneQParser which can be directly extended in our MyGroundShakingQueryParser!

public class MyGroundShakingQueryParser 
                           extends GroundShakingLuceneQParserPlugin {
    public QParser createParser(String qstr, 
                                SolrParams localParams,
                                SolrParams params,
                                SolrQueryRequest req) {}
}

To register the MyGroundShakingQueryParser in solr, you need to add the following line into solrconfig.xml:

<queryparser class="com.groundshaking.MyGroundShakingQueryParser" name="groundshakingqparser"/ >


To use it, just specify the name in the defType=groundshakingqparser as a query parameter to Solr.


By the way, one convenience of this implementation is that we can deploy the above classes in a jar under solr core's lib directory. I.e. we do not need to overhaul solr source code and deal with deploying some "custom" solr shards.


Monday, February 24, 2014

First Android app published

First Android app published! To be used in Helsinki Metropolitan Area. Give it a spin!


PysaDroid is an easy and clutter free app for planning your journey in the Helsinki Metropolitan Area similar to what you get with HSL service https://www.hsl.fi/. Currently bus routes are supported only.
The name PysaDroid comes from a blend of Pysäkki ([bus] stop in Finnish) and Android.
Key features:
- Non-intrusive autocomplete. Very useful feature if you feel like you don't remember the full street or place name. Or it is just too freezing outside to type with bare fingers.
- Clean design of the resulting routes
- Latest search button that remembers your last search! Press the bus button to load your latest search.
- Take me to home functionality: set up the direction to home on the results page once by pressing the button with home icon and use every day!
- Take me to the office functionality: similar to take me home.
- View the route on the map.

Sunday, February 23, 2014

Android: filler / divider between columns in a TableLayout

Android is pretty tricky to deal with at times, and surprisingly difficult for something very simple..
..like adding a filler between columns in a TableLayout. "Gotta be simpler!" I thought after having spent countless minutes reading up over countless suggestions and recipes.

So I took the path of just creating an empty filler.png image in the mspaint, just a vertical bar, and inserting it programmatically:

ImageView dividerView = new ImageView(this);
dividerView.setImageResource(R.drawable.filler);

Then added this to a TableRow object which subsequently should be added to the aforementioned TableLayout.

Before adding a divider:


After adding a divider: